As an Amazon Associate, this site earns commissions from qualifying purchases. For more information click here.
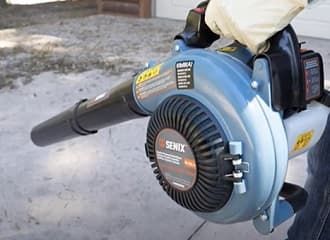
Have you ever had a problem getting a leaf blower to prime? Unless this is resolved the engine just won’t start. Without further ado, here are the top reasons why this happens and how to permanently fix it.
There are a few likely reasons why a leaf blower does not prime. The carburetor is dirty and needs cleaning, the primer bulb could be damaged and must be replaced, or the fuel filter is dirty. Replacing the fuel filter and fuel line will be necessary.
While these are the most common causes, there are other potential culprits. We will look at all of them and provide detailed troubleshooting below.
Fuel Needs Replacement
Before trying any fix, check the fuel tank. If the fuel has not been replaced for over a month, that is probably the reason it cannot prime.
When gas sits for a long time, it eventually dissipates and turns into sludge. This residue cannot be used as fuel and worse, it sticks all over the engine.
There are two problems here: one, there is little to no more usable fuel left. Two, the sludge seeps into the engine and clogs everything. This prevents the fuel from priming.
Solution. Leaf blower fuel has to be replaced every 4 weeks. If you have not done so, you have to drain the fuel tank, clean it and pour fresh fuel. Follow these steps.
- Turn the leaf blower off.
- Drain whatever fuel is left in the tank.
- Wipe the oil sludge, carbon deposits and other debris. We like to use Star Brite because it removes oil sludge and other grime quickly.
- Pour fresh fuel.
- Turn the leaf blower on.
If the blower primes then old fuel was the problem. If not, try the following solutions.
Dirty Carburetor
A lot of leaf blower engine problems can be traced to a clogged carburetor. Because it is integral to how leaf blowers work it will eventually accumulate dirt, dust and grime. Old fuel residue will also clog it up.
How to clean a leaf blower carburetor:
The following instructions are for 2-stroke leaf blowers.
- Remove the air filter cover and the filter. You might have to use a screwdriver depending on the blower design. You now have access to the carburetor.
- Take note of how many fuel lines there are and where they connect. If there are two, one is for the primer bulb and the other is the carburetor main line. Remember which line goes where. Have a container handy as there might be some fuel left.
- Using a screwdriver, disassemble the carburetor. Take out one piece at a time and place them in sequential order on a table. This way you can put them the right order you took them apart.
- Use a carburetor cleaner to wipe the debris and any sludge. The WD-40 Specialist Carb/Throttle Body & Parts Cleaner is a good choice.
- Wait for the cleaner to do its work. Now reassemble the carburetor, putting the pieces back in order.
Clogged Fuel Line
The fuel line moves fuel from one place to another. In the case of leaf blowers, the line transmits gas into the carburetor for priming.
If there is even a slight problem with these lines, fuel will not reach the engine and it cannot prime. Just like other engine parts, fuel lines get worn out or suffer damage. A clogged fuel line is also one of the reasons why a leaf blower may get hot and shut down.
Solution. It is possible to fix fuel lines but replacing them is the better choice. Repairs can be costly and if the line breaks down again, it will only get worse.
- You can buy fuel lines for your leaf blower by going to its official website. Look for a line that is compatible with your leaf blower model.
- When you have new fuel lines, follow these steps.
- Shut the leaf blower down. Allow the engine to cool down.
- Empty the fuel tank.
- Note where the fuel lines are attached. You have to put them back the exact way.
- Detach the fuel lines. Do the same with the vent line if required.
- Use a screwdriver to remove the grommet from the fuel reservoir. This should release the fuel line.
- Remove the fuel line filter and disconnect the line off the grommet.
- Install the new fuel line into the grommet.
- Put the fuel line filter fitting.
- Place the fuel filter and line into the fuel reservoir.
- Orient the fuel lines correctly and set the grommet in position.
- Reconnect the fuel lines and vent line.
- Turn the leaf blower and test it.
Damaged Primer Bulb
The primer bulb is a button used to prime leaf blower engines. Press the button and it produces a vacuum that pulls fuel into the fuel line. The line transmits the gas into the carburetor where it gets readied to be primed.
Primer bulbs are subject to corrosion and get worn out. When this happens it can no longer function. The fix is easy though.
Solution. If the primer bulb is damaged it has to be replaced. No matter what leaf blower type, the process is fairly simple.
- Go to the official website of your leaf blower manufacturer and search for a compatible primer bulb. Buy one that is an exact fit for your leaf blower make and model.
- Remove the spark plug from the leaf blower.
- Find the primer bulb. It will be located near the carburetor or somewhere else. Refer to your owner’s manual.
- If the primer bulb is on the carburetor, remove the spark plug and air filter cover. Clamp the fuel lines and detach them from the primer bulb with a screwdriver.
- Snap the primer bulb off.
- Install the new primer bulb.
- Reinstall any parts you removed.
- Turn the leaf blower on.
Faulty Fuel Filter
The fuel filter keeps dirt out the engine similar to how air filters work. And just like air filters, fuel filters get dirty. These may be cleaned or for one time use only depending on the leaf blower design. If yours can be cleaned and reused, the steps are as follows.
Solution. Clean or replace the fuel filter.
How to clean a leaf blower fuel filter
- Shut the leaf blower down.
- Empty the fuel tank.
- Disconnect the spark plug wire and boot. This is a precautionary step to avoid sudden sparks.
- Set the blower choke to the center.
- Locate the fuel filter cover. Usually, it is on the left or right side. Check your owner’s manual if you are not sure.
- The cover might be screwed on bolted on. Remove the filter cover.
- Brush all dirt you see or use a piece of cloth.
- Take out the fuel filter and the pre-filter.
- Clean the pre-filter under running water or leave it in soapy water for a few minutes. Rinse in clean water. Wipe the pre-filter dry.
- Take out the felt filter and clean it with canned air or a brush.
- Put the filter and pre-filter back on.
- Reconnect the screws.
- Reattach the spark plug wire.
- Refill the fuel tank and test the leaf blower.
How to replace a leaf blower fuel filter
- Shut the leaf blower and let the engine cool down.
- Disconnect the spark plug wire and boot.
- Unthread the fuel reservoir cap and free the retainer from the reservoir.
- Take out the fuel filter out of the fuel reservoir. You might need a piece of wire to do this.
- Use a screwdriver or needle pliers to move the retaining spring off the filter.
- Remove the fuel filter. Some pulling is necessary.
- Once you have removed the old fuel filter, install the new one by connecting it to the fuel line.
- Push the filter into the fuel reservoir.
- Reset the fuel cap retainer. Do the same with the thread.
- Pour fresh fuel into the tank.
- Reconnect the spark plug wire and boot.
Once you have done this, turn the leaf blower on. It should run fine now and experience no more priming problems.

I love the outdoors and all the tools for maintaining gardens, yards and lawns. The only thing I am more passionate about is sharing what I know about garden and outdoor equipment.

